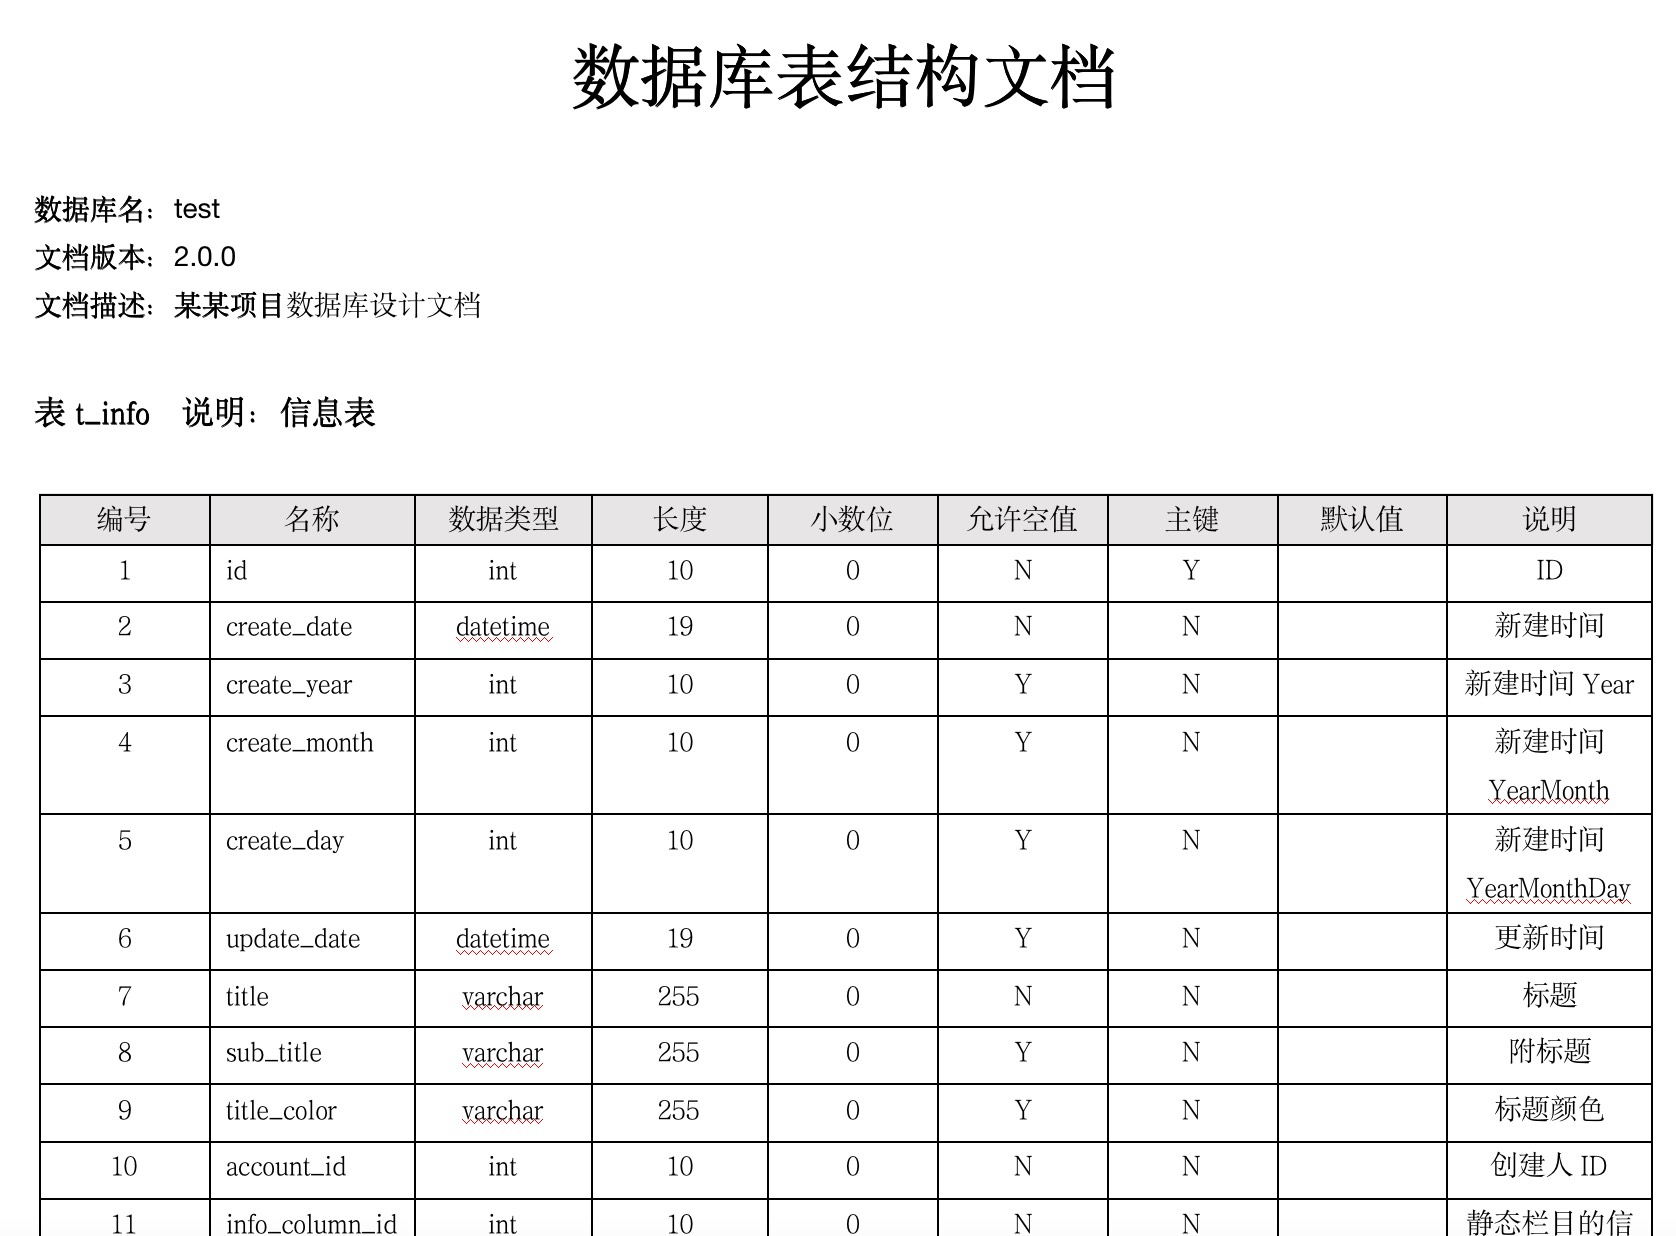
开发中需要导出数据库结构说明文档交付给客户或者拿出来讨论等,如果手工去写的话,还是比较费劲的,不过可以使用screw来自动生成,如下图所示,是利用screw自动生成的数据库说明文档。
一、数据库支持
- MySQL
- MariaDB
- TIDB
- Oracle
- SqlServer
- PostgreSQL
- Cache DB
二、配置
1、pom文件
引入screw核心包,HikariCP数据库连接池,HikariCP号称性能最出色的数据库连接池。
<!-- screw核心 -->
<dependency>
    <groupId>cn.smallbun.screw</groupId>
    <artifactId>screw-core</artifactId>
    <version>1.0.3</version>
</dependency>

<!-- HikariCP -->
<dependency>
    <groupId>com.zaxxer</groupId>
    <artifactId>HikariCP</artifactId>
    <version>3.4.5</version>
</dependency>

<!--mysql driver-->
<dependency>
    <groupId>mysql</groupId>
    <artifactId>mysql-connector-java</artifactId>
    <version>8.0.20</version>
</dependency>
2、配置数据源
配置数据源,设置 useInformationSchema 可以获取tables注释信息。
spring.datasource.url=jdbc:mysql://192.168.1.5:3306/test?useUnicode=true&characterEncoding=UTF-8&useSSL=false
spring.datasource.username=root
spring.datasource.password=123456
spring.datasource.driver-class-name=com.mysql.cj.jdbc.Driver
spring.datasource.xa.properties.useInformationSchema=true
3、screw 核心配置
screw有两种执行方式,第一种是pom文件配置,另一种是代码执行。
<build>
    <plugins>
        <plugin>
            <groupId>org.springframework.boot</groupId>
            <artifactId>spring-boot-maven-plugin</artifactId>
        </plugin>
        <plugin>
            <groupId>cn.smallbun.screw</groupId>
            <artifactId>screw-maven-plugin</artifactId>
            <version>1.0.3</version>
            <dependencies>
                <!-- HikariCP -->
                <dependency>
                    <groupId>com.zaxxer</groupId>
                    <artifactId>HikariCP</artifactId>
                    <version>3.4.5</version>
                </dependency>
                <!--mysql driver-->
                <dependency>
                    <groupId>mysql</groupId>
                    <artifactId>mysql-connector-java</artifactId>
                    <version>8.0.20</version>
                </dependency>
            </dependencies>
            <configuration>
                <!--username-->
                <username>root</username>
                <!--password-->
                <password>123456</password>
                <!--driver-->
                <driverClassName>com.mysql.cj.jdbc.Driver</driverClassName>
                <!--jdbc url-->
                <jdbcUrl>jdbc:mysql://192.168.1.5:3306/test</jdbcUrl>
                <!--生成文件类型-->
                <fileType>HTML</fileType>
                <!--打开文件输出目录-->
                <openOutputDir>false</openOutputDir>
                <!--生成模板-->
                <produceType>freemarker</produceType>
                <!--文档名称 为空时:将采用[数据库名称-描述-版本号]作为文档名称-->
                <!--<docName>测试文档名称</docName>-->
                <!--描述-->
                <description>数据库文档生成</description>
                <!--版本-->
                <version>${project.version}</version>
                <!--标题-->
                <title>fire数据库文档</title>
            </configuration>
            <executions>
                <execution>
                    <phase>compile</phase>
                    <goals>
                        <goal>run</goal>
                    </goals>
                </execution>
            </executions>
        </plugin>
    </plugins>
</build>
配置完以后,在 maven project->screw 双击执行ok。
pom执行方式
4、代码生成方式
import cn.smallbun.screw.core.Configuration;
import cn.smallbun.screw.core.engine.EngineConfig;
import cn.smallbun.screw.core.engine.EngineFileType;
import cn.smallbun.screw.core.engine.EngineTemplateType;
import cn.smallbun.screw.core.execute.DocumentationExecute;
import cn.smallbun.screw.core.process.ProcessConfig;
import org.junit.jupiter.api.Test;
import org.springframework.beans.factory.annotation.Autowired;
import org.springframework.boot.test.context.SpringBootTest;
import org.springframework.context.ApplicationContext;

import javax.sql.DataSource;
import java.util.ArrayList;
import java.util.Arrays;
import java.util.List;

@SpringBootTest
class ScrewApplicationTests {

   @Autowired
   ApplicationContext applicationContext;

   @Test
   void contextLoads() {
      DataSource dataSourceMysql = applicationContext.getBean(DataSource.class);

      // 生成文件配置
      EngineConfig engineConfig = EngineConfig.builder()
            // 生成文件路径,自己mac本地的地址,这里需要自己更换下路径
            .fileOutputDir("/Users/mac/Desktop")
            // 打开目录
            .openOutputDir(false)
            // 文件类型
            .fileType(EngineFileType.HTML)
            // 生成模板实现
            .produceType(EngineTemplateType.freemarker).build();

      // 生成文档配置(包含以下自定义版本号、描述等配置连接)
      Configuration config = Configuration.builder()
            .version("1.0.3")
            .description("生成文档信息描述")
            .dataSource(dataSourceMysql)
            .engineConfig(engineConfig)
            .produceConfig(getProcessConfig())
            .build();

      // 执行生成
      new DocumentationExecute(config).execute();
   }


   /**
    * 配置想要生成的表+ 配置想要忽略的表
    * @return 生成表配置
    */
   public static ProcessConfig getProcessConfig(){
      // 忽略表名
      List<String> ignoreTableName = Arrays.asList("aa","test_group");
      // 忽略表前缀,如忽略a开头的数据库表
      List<String> ignorePrefix = Arrays.asList("a","t");
      // 忽略表后缀
      List<String> ignoreSuffix = Arrays.asList("_test","czb_");

      return ProcessConfig.builder()
            //根据名称指定表生成
            .designatedTableName(new ArrayList<>())
            //根据表前缀生成
            .designatedTablePrefix(new ArrayList<>())
            //根据表后缀生成
            .designatedTableSuffix(new ArrayList<>())
            //忽略表名
            .ignoreTableName(ignoreTableName)
            //忽略表前缀
            .ignoreTablePrefix(ignorePrefix)
            //忽略表后缀
            .ignoreTableSuffix(ignoreSuffix).build();
   }
}
Main方法直接运行的方式:
/*
 * Copyright (c) 2022.
 *
 * Unless required by applicable law or agreed to in writing, software
 * distributed under the License is distributed on an "AS IS" BASIS,
 * WITHOUT WARRANTIES OR CONDITIONS OF ANY KIND, either express or implied.
 * See the License for the specific language governing permissions and
 * limitations under the License.
 *
 */

package com.terrynow.test;

import cn.smallbun.screw.core.Configuration;
import cn.smallbun.screw.core.engine.EngineConfig;
import cn.smallbun.screw.core.engine.EngineFileType;
import cn.smallbun.screw.core.engine.EngineTemplateType;
import cn.smallbun.screw.core.execute.DocumentationExecute;
import cn.smallbun.screw.core.process.ProcessConfig;
import com.zaxxer.hikari.HikariConfig;
import com.zaxxer.hikari.HikariDataSource;

import javax.sql.DataSource;
import java.util.ArrayList;

/**
 * @author Terry E-mail: yaoxinghuo at 126 dot com
 * @date 2022/10/9 17:32
 * @description
 */
public class TestScrew {
    public static void main(String[] args) {
        //数据源
        HikariConfig hikariConfig = new HikariConfig();
        hikariConfig.setDriverClassName("com.mysql.cj.jdbc.Driver");
        hikariConfig.setJdbcUrl("jdbc:mysql://192.168.1.5:3306/test");
        hikariConfig.setUsername("root");
        hikariConfig.setPassword("123456");
        //设置可以获取tables remarks信息
        hikariConfig.addDataSourceProperty("useInformationSchema", "true");
        hikariConfig.setMinimumIdle(2);
        hikariConfig.setMaximumPoolSize(5);
        DataSource dataSource = new HikariDataSource(hikariConfig);


        // 生成文件配置
        EngineConfig engineConfig = EngineConfig.builder()
                // 生成文件路径,自己mac本地的地址,这里需要自己更换下路径
                .fileOutputDir("/Users/Terry/Downloads")
                // 打开目录
                .openOutputDir(true)
                // 文件类型
                .fileType(EngineFileType.WORD)
                // 生成模板实现
                .produceType(EngineTemplateType.freemarker).build();

        //忽略表
        ArrayList<String> ignoreTableName = new ArrayList<>();
        ignoreTableName.add("test_user");
        ignoreTableName.add("test_group");
        //忽略表前缀
        ArrayList<String> ignorePrefix = new ArrayList<>();
        ignorePrefix.add("test_");
        //忽略表后缀
        ArrayList<String> ignoreSuffix = new ArrayList<>();
        ignoreSuffix.add("_test");
        ProcessConfig processConfig = ProcessConfig.builder()
                //指定生成逻辑、当存在指定表、指定表前缀、指定表后缀时,将生成指定表,其余表不生成、并跳过忽略表配置
                //根据名称指定表生成
                .designatedTableName(new ArrayList<>())
                //根据表前缀生成
                .designatedTablePrefix(new ArrayList<>())
                //根据表后缀生成
                .designatedTableSuffix(new ArrayList<>())
                //忽略表名
                .ignoreTableName(ignoreTableName)
                //忽略表前缀
                .ignoreTablePrefix(ignorePrefix)
                //忽略表后缀
                .ignoreTableSuffix(ignoreSuffix).build();
        //配置
        Configuration config = Configuration.builder()
                //版本
                .version("1.0.0")
                //描述
                .description("数据库设计文档生成")
                //数据源
                .dataSource(dataSource)
                //生成配置
                .engineConfig(engineConfig)
                //生成配置
                .produceConfig(processConfig)
                .build();
        //执行生成
        new DocumentationExecute(config).execute();
    }

}
4、文档格式
screw 有 HTML、DOC、MD 三种格式的文档。
代码中的修改
.fileType(EngineFileType.HTML)或者pom文件
<fileType>MD</fileType>
5、链接
文档工具 screw:https://gitee.com/leshalv/screw
6、可能遇到的问题
数据库是Oracle的情况下,可能遇到如下报错:
Exception in thread "main" java.lang.AbstractMethodError: Receiver class oracle.jdbc.driver.T4CConnection does not define or inherit an implementation of the resolved method 'abstract java.lang.String getSchema()' of interface java.sql.Connection.
    at com.zaxxer.hikari.pool.HikariProxyConnection.getSchema(HikariProxyConnection.java)
解决办法是更换Oracle的dependency(之前使用的是ojdbc6 11.2.0.3):
<dependency>
    <groupId>com.github.noraui</groupId>
    <artifactId>ojdbc8</artifactId>
    <version>12.2.0.1</version>
</dependency>

文章评论